Making your own butter at home is a rewarding and surprisingly simple process. With just a few basic ingredients and tools, you can create rich, creamy butter that’s far superior to store-bought varieties. Whether you’re interested in traditional churning methods, using modern appliances, or exploring creative flavor additions, this guide will walk you through everything you need to know.
The cream should be at room temperature, ideally between 15°C to 18°C, when making butter. This temperature range allows the cream to churn efficiently, ensuring that the fat separates from the liquid to form butter.
If the cream is too cold, it will take much longer to churn, and the butter might not form properly. On the other hand, if the cream is too warm, the butter could become greasy and may not separate cleanly from the buttermilk.
So, before you start churning, let the cream sit out of the fridge for about 1-2 hours to reach the ideal temperature.
Why Make Your Own Butter?
Before diving into the how-to, let’s talk about why you might want to make your own butter. Homemade butter not only tastes better but also allows you to control the ingredients, avoiding preservatives and additives. Plus, the leftover buttermilk can be used in various recipes, making the process both economical and versatile.
Traditional Butter Making with a Butter Churn
Traditional butter making is a nostalgic and hands-on way to create butter. Here’s how you can do it:
Ingredients for making butter:
- Heavy cream (preferably raw or organic)
- Salt (optional)
Tools:
- Butter churn or a large mason jar
- Wooden spoon or spatula
- Cheesecloth or butter muslin
Steps:
- Pour the Cream: Fill your butter churn or mason jar about halfway with heavy cream. If you’re using a mason jar, make sure it’s sealed tightly.
- Start Churning: If you’re using a butter churn, start turning the handle. If using a jar, shake it vigorously. After about 10-15 minutes, the cream will thicken, separating into butter and buttermilk.
- Strain and Rinse: Once the butter has formed, strain off the buttermilk using cheesecloth. Rinse the butter under cold water to remove any remaining buttermilk, which can spoil if left in.
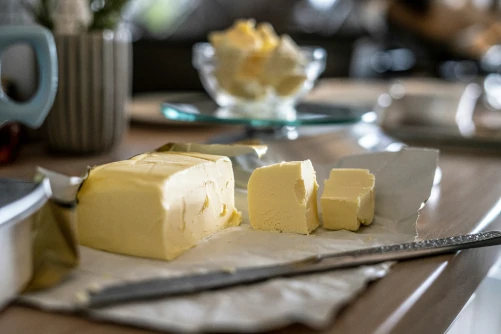
- Season and Store: Add a pinch of salt if desired and knead the butter with a wooden spoon to remove any remaining liquid. Shape it into a log or press it into a mold, then store it in the fridge.
Making Butter with a Stand Mixer
For a quicker, less labor-intensive method, a stand mixer is a fantastic tool.
Ingredients:
- Heavy cream
- Salt (optional)
Tools:
- Stand mixer with a whisk attachment
- Fine mesh strainer or cheesecloth
- Wooden spoon
Steps:
- Pour the Cream: Place the heavy cream in the bowl of your stand mixer.
- Whip the Cream: Start mixing on medium speed. After about 5-10 minutes, the cream will go through the stages of whipped cream and then start to curdle, eventually separating into butter and buttermilk.
- Strain and Rinse: Once you see the butter forming, stop the mixer and strain out the buttermilk. Rinse the butter under cold water to ensure all the buttermilk is removed.
- Add Salt and Store: Mix in salt if you like, then knead and shape your butter before storing it in the fridge.
Making Butter in a Food Processor
Using a food processor is one of the fastest methods to make butter at home.
Ingredients:
- Heavy cream
- Salt (optional)
Tools:
- Food processor
- Fine mesh strainer or cheesecloth
- Wooden spoon
Steps:
- Pour the Cream: Place the cream in your food processor.
- Process the Cream: Start the food processor and let it run for about 5 minutes. The cream will first whip up, then start to separate into butter and buttermilk.
- Strain and Rinse: Stop the processor once the butter has formed, and strain off the buttermilk. Rinse the butter thoroughly under cold water.
- Season and Shape: Add salt if desired, knead the butter to remove excess liquid, and store it in your preferred container.
Cultured Butter for Extra Flavor
Cultured butter has a tangy flavor and is made by fermenting the cream before churning. This method adds an extra step but is worth it for the unique taste.
Ingredients:
- Heavy cream
- 2 tablespoons of plain yogurt or buttermilk
- Salt (optional)
Tools:
- Stand mixer, food processor, or butter churn
- Fine mesh strainer or cheesecloth
Steps:
- Ferment the Cream: Mix the cream with yogurt or buttermilk and leave it covered at room temperature for 12-24 hours to culture. The cream will thicken and develop a tangy flavor.
- Churn the Cream: After fermentation, follow the same steps as in the previous methods to churn, strain, rinse, and knead the butter.
Flavored Butter: Get Creative!
Once you’ve mastered basic butter, you can start experimenting with flavors. Add ingredients like fresh herbs, garlic, honey, or spices to create compound butters.
Ideas for Flavored Butter:
- Herb Butter: Mix in finely chopped parsley, chives, and thyme.
- Garlic Butter: Add roasted garlic for a savory twist.
- Honey Butter: Blend in honey and a pinch of cinnamon for a sweet treat.
- Spicy Butter: Stir in chili flakes or sriracha for a kick.
Storing and Using Your Homemade Butter
Homemade butter can be stored in the refrigerator for up to a week or frozen for longer storage. Use it just like store-bought butter—in baking, cooking, or simply spreading on a piece of fresh bread.
Making your own butter is not only a fun and satisfying process, but it also allows you to enjoy the freshest, most flavorful butter possible. Whether you stick to the basics or explore the world of flavored and cultured butters, the possibilities are endless. Try it out and bring a touch of homemade goodness to your kitchen!